Hadoop集群的搭建
2019-01-23
联系方式
- My blog address :zhongjiazhai
- Email address: zhaizhongjia2010@163.com
- Weibo: ZhongJia_Zhai
使用VMvare创建一个虚拟机,我使用的是Red had linux 7.4,并关闭全部虚拟机的防火墙
-
因为默认的虚拟机主机名都是linux,所以为了便于虚拟机的识别,创建完成虚拟机后我们对虚拟机名进行修改,我们把用于主节点的虚拟机名称设为 bigdata111(按自己的喜好创建)
-
修改主机名的命令:sudo gedit /etc/hostname
-
为了虚拟机之间能ping通,需要修改虚拟机的ip地址; 命令:sudo gedit /etc/hosts
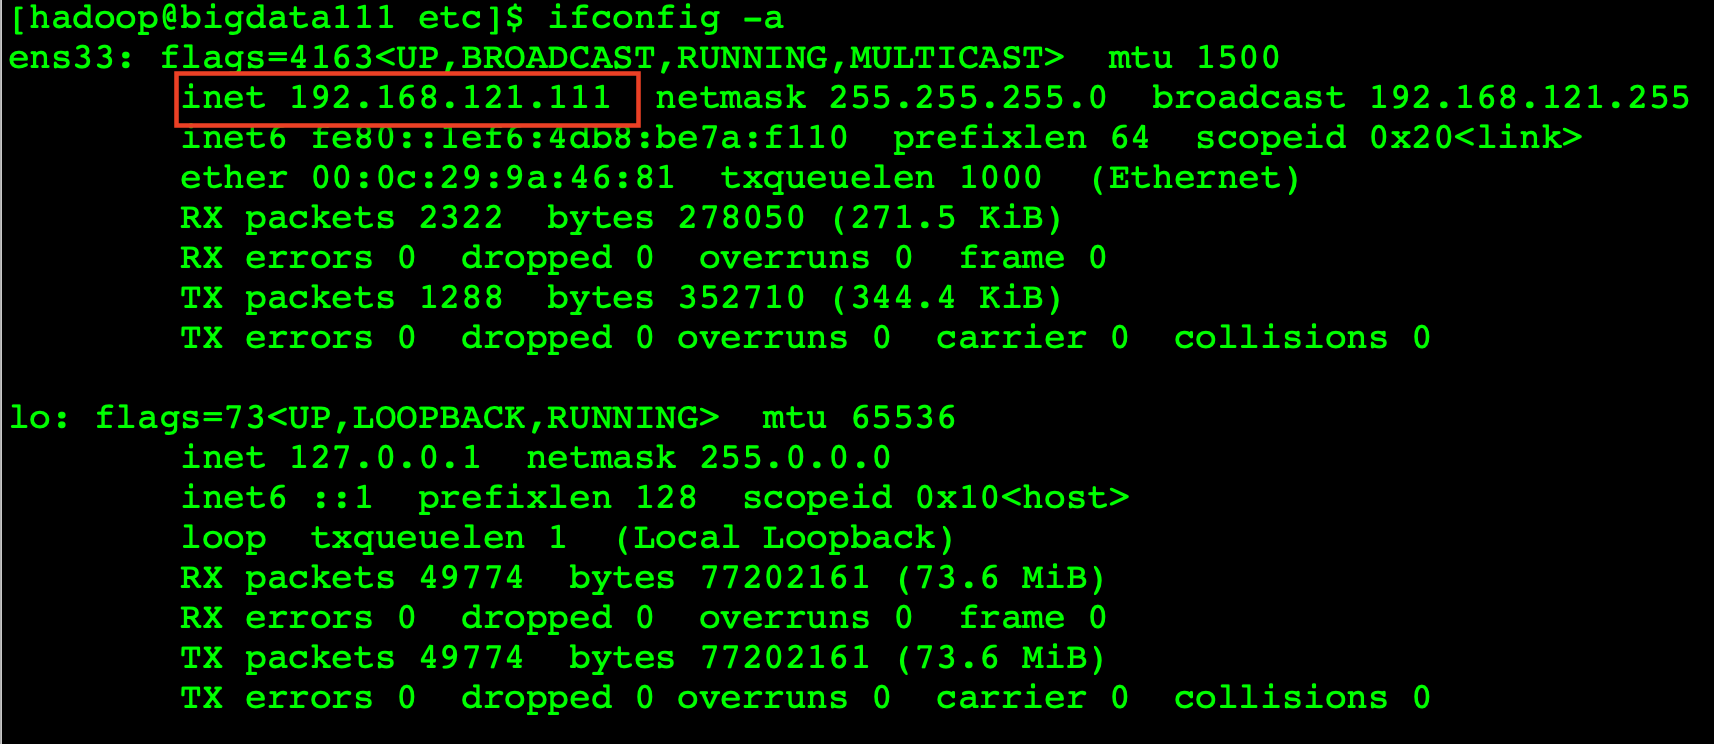
在linux如何查看ip地址,命令: ifconfig -a;
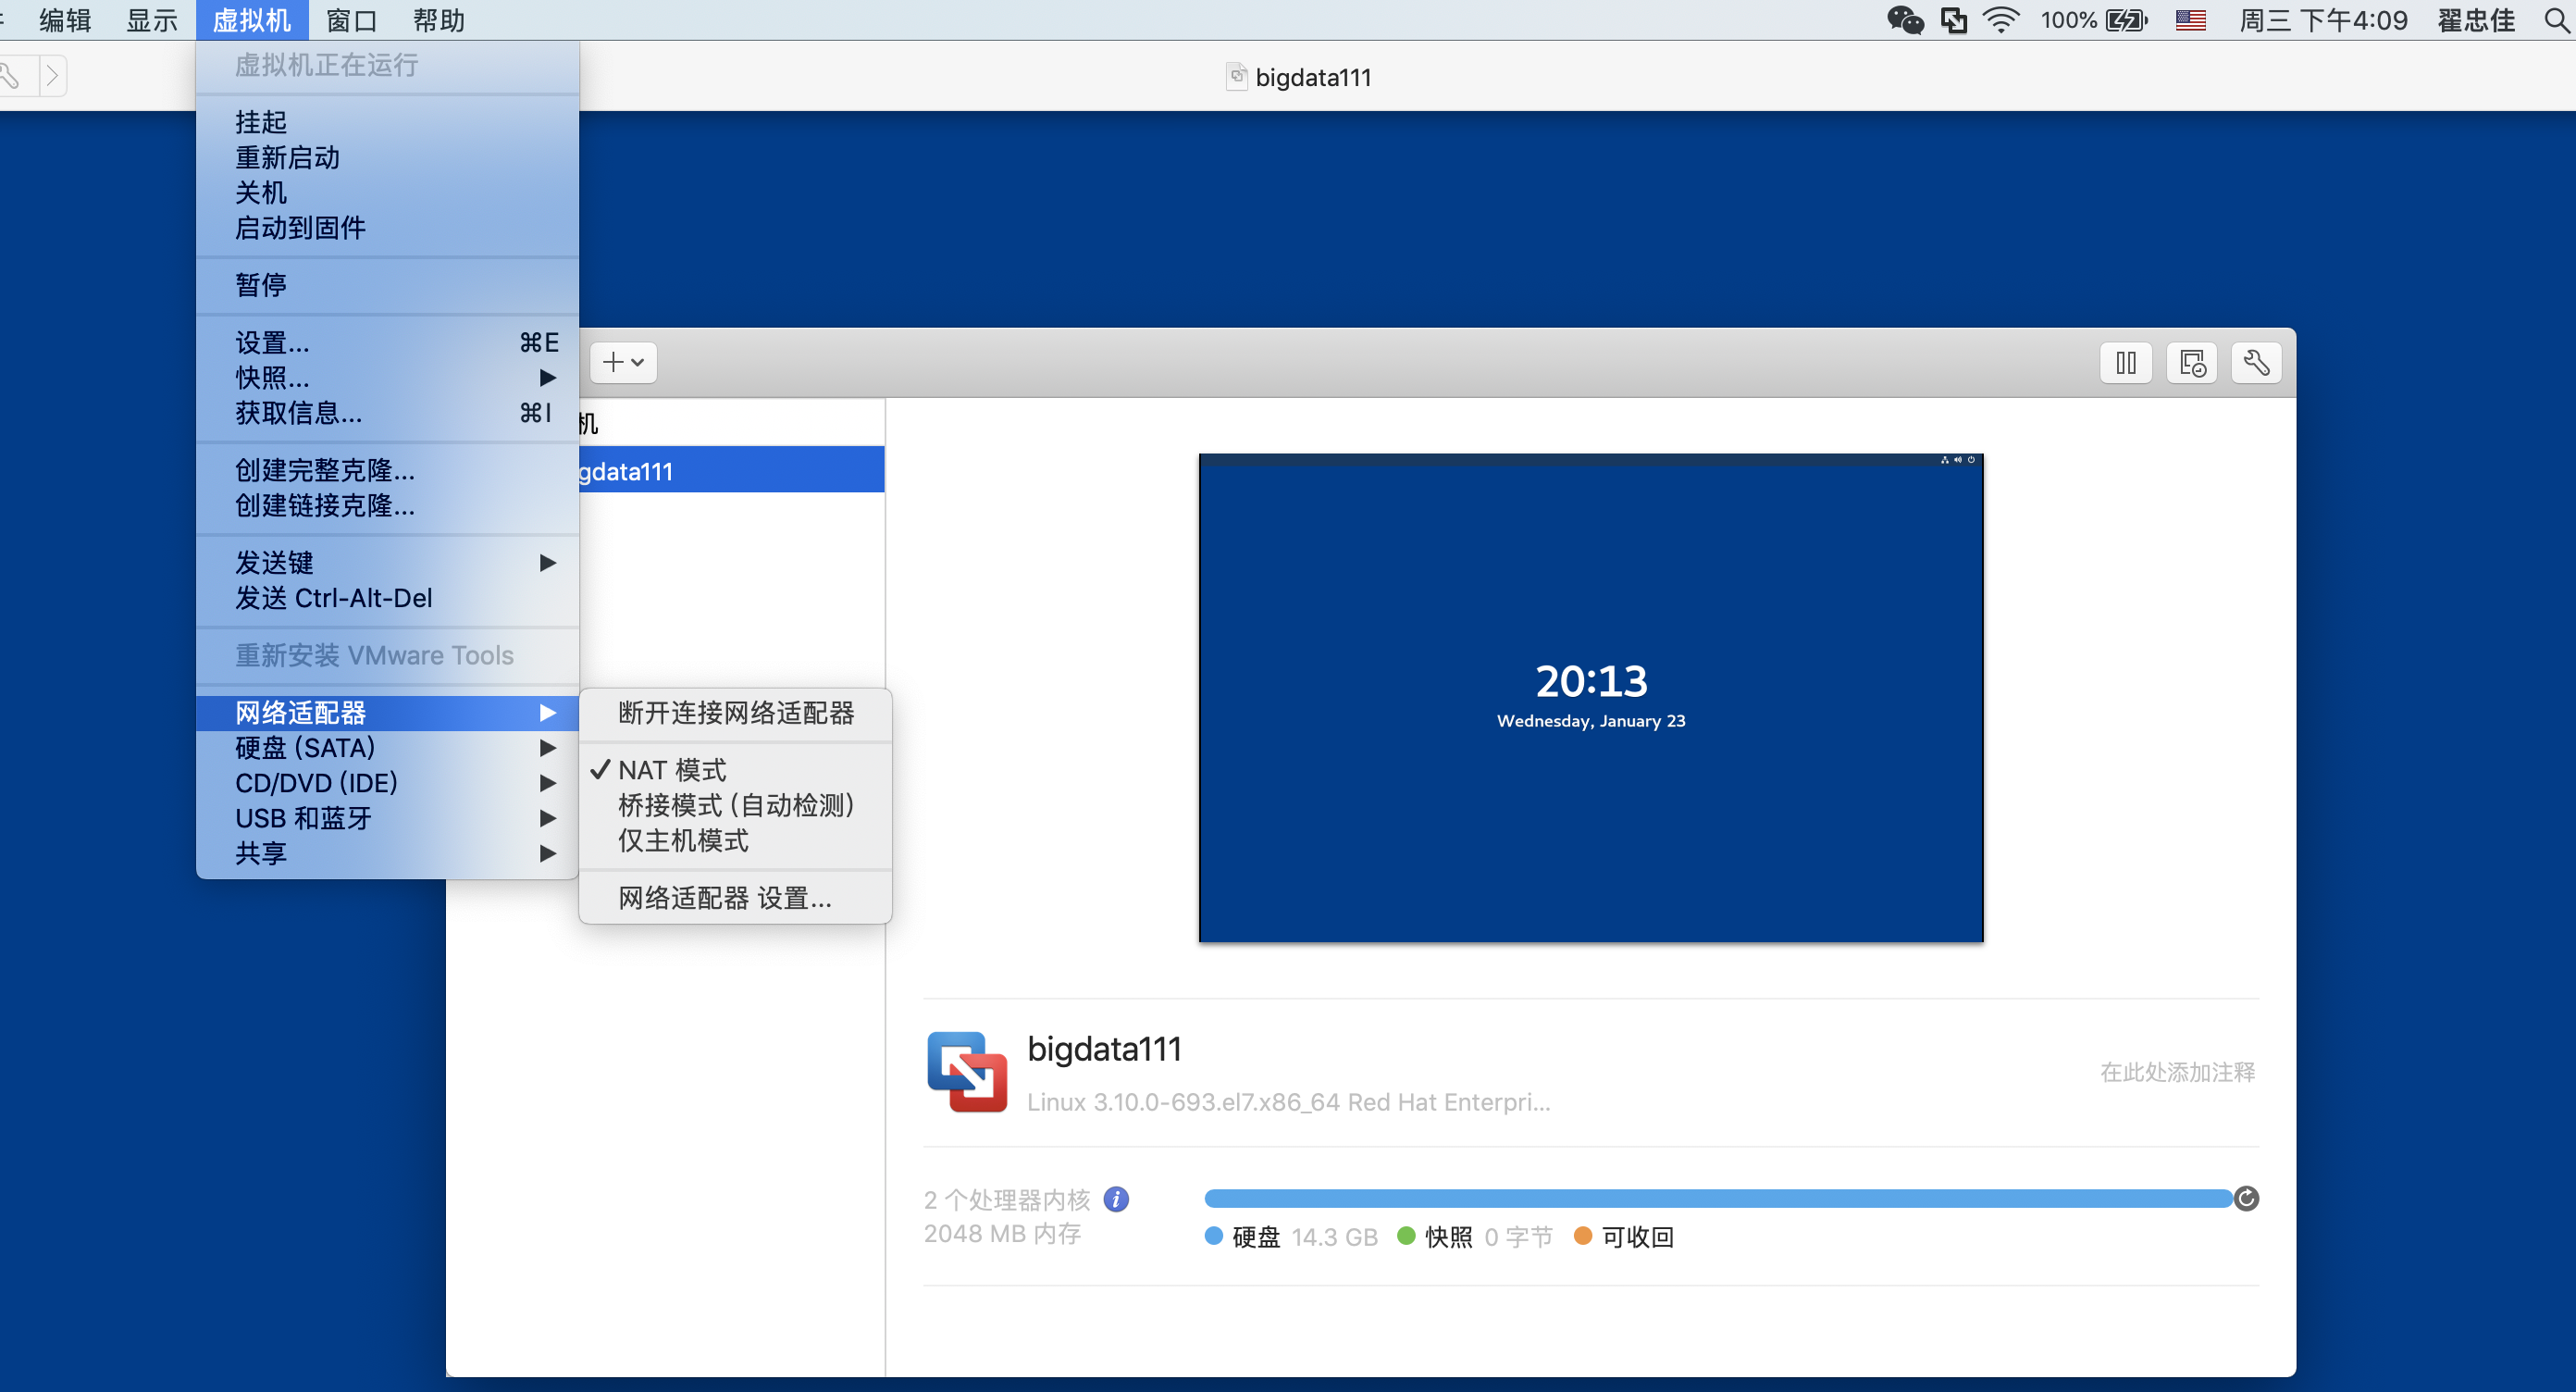
- 修改虚拟机网络设置 1、虚拟机网络适配器选择 NAT模式,如下图:
2、虚拟机网络设置,如下图:

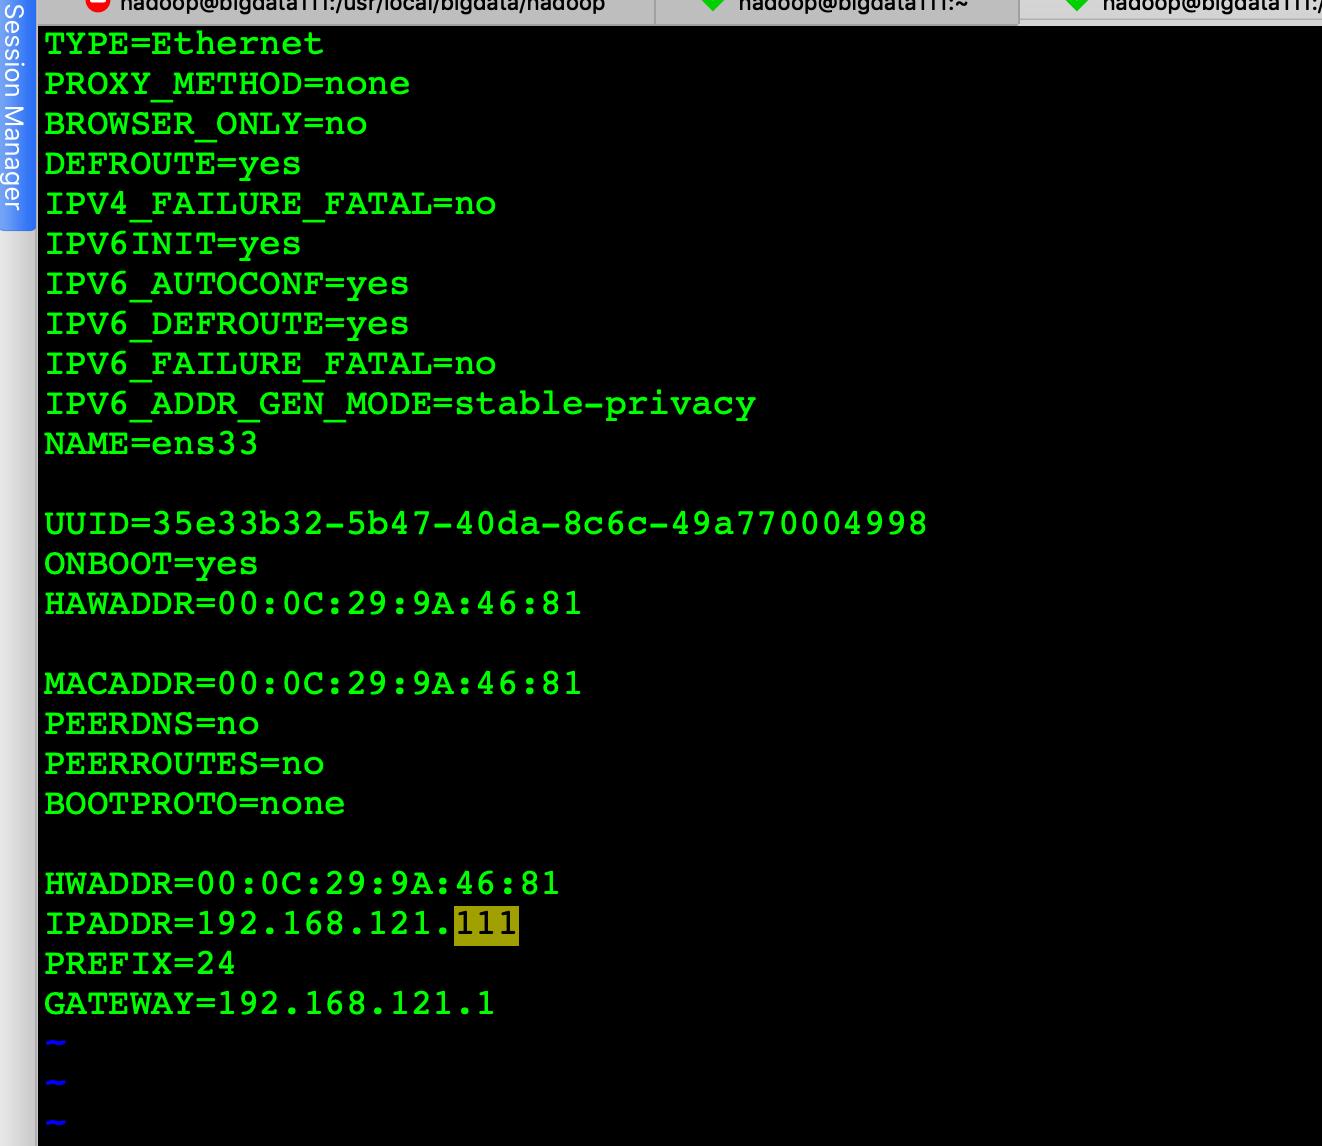
3、修改虚拟机网络文件配置,命令: vim /etc/sysconfig/network-scripts/ifcfg-enp0s3 修改完截图如下:
Hadoop的安装与配置
创建文件目录
为了便于管理,给redHat1的hdfs的NameNode、DataNode及临时文件,在用户目录下创建目录:
/data/hdfs/name
/data/hdfs/data
/data/hdfs/tmp
然后将这些目录通过scp命令拷贝到redHat2和redHat3的相同目录下。
下载
首先到Apache官网下载Hadoop,从中选择推荐的下载镜像,我选择hadoop-2.7.1的版本,并使用以下命令下载到redHat1机器的
/data目录:
wget http://archive.apache.org/dist/hadoop/core/hadoop-2.7.1/hadoop-2.7.1.tar.gz
然后使用以下命令将hadoop-2.7.1.tar.gz 解压缩到/data目录
tar -zxvf hadoop-2.7.1.tar.gz
### 配置环境变量
回到/data目录,配置hadoop环境变量,命令如下:
vim /etc/profile
在/etc/profile添加如下内容
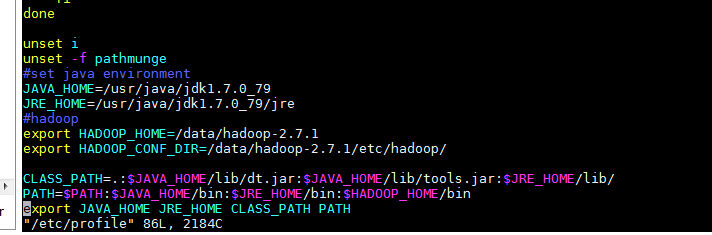
立刻让hadoop环境变量生效,执行如下命令:
source /etc/profile
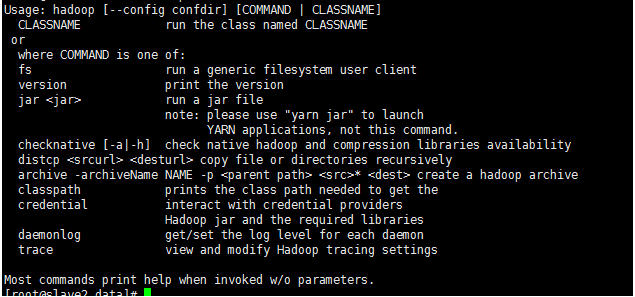
再使用hadoop命令,发现可以有提示了,则表示配置生效了。
hadoop
显示如下内容:
hadoop的配置
进入hadoop-2.7.1的配置目录:
cd /data/hadoop-2.7.1/etc/hadoop
依次修改core-site.xml、hdfs-site.xml、mapred-site.xml、yarn-site.xml以及slaves文件。
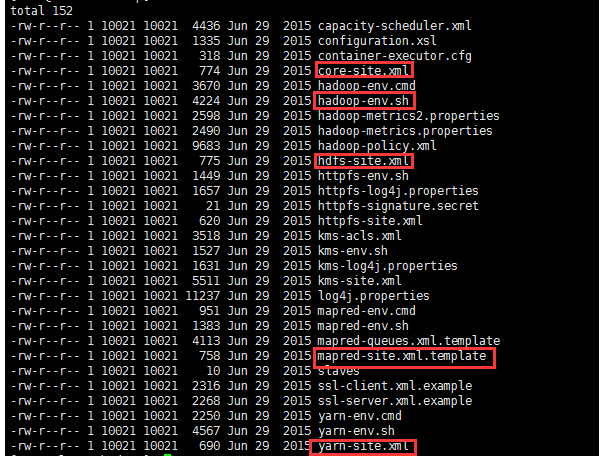
修改core-site.xml
<configuration>
 <property>
   <name>hadoop.tmp.dir</name>
   <value>file:/data/hdfs/tmp</value>
   <description>A base for other temporary directories.</description>
 </property>
 <property>
   <name>io.file.buffer.size</name>
   <value>131072</value>
 </property>
 <property>
   <name>fs.default.name</name>
   <value>hdfs://bigdata111:9000</value>
 </property>
 <property>
   <name>hadoop.proxyuser.root.hosts</name>
   <value>*</value>
 </property>
 <property>
   <name>hadoop.proxyuser.root.groups</name>
   <value>*</value>
 </property>
</configuration
注意:hadoop.tmp.dir的value填写对应前面创建的目录
修改 hdfs-site.xml
<?xml version="1.0" encoding="UTF-8"?>
 <?xml-stylesheet type="text/xsl" href="configuration.xsl"?>
 <!--
   Licensed under the Apache License, Version 2.0 (the "License");
   you may not use this file except in compliance with the License.
   You may obtain a copy of the License at

     http://www.apache.org/licenses/LICENSE-2.0

   Unless required by applicable law or agreed to in writing, software
   distributed under the License is distributed on an "AS IS" BASIS,
   WITHOUT WARRANTIES OR CONDITIONS OF ANY KIND, either express or implied.
   See the License for the specific language governing permissions and
   limitations under the License. See accompanying LICENSE file.
 -->

 <!-- Put site-specific property overrides in this file. -->

<configuration>
 <property>
   <name>dfs.replication</name>
   <value>2</value>
 </property>
 <property>
   <name>dfs.namenode.name.dir</name>
   <value>file:/data/hdfs/name</value>
   <final>true</final>
 </property>
 <property>
   <name>dfs.datanode.data.dir</name>
   <value>file:/data/hdfs/data</value>
   <final>true</final>
 </property>
 <property>
   <name>dfs.namenode.secondary.http-address</name>
   <value>bigdata111:9001</value>
 </property>
 <property>
   <name>dfs.webhdfs.enabled</name>
   <value>true</value>
 </property>
 <property>
   <name>dfs.permissions</name>
   <value>false</value>
 </property>
</configuration>
注意:dfs.namenode.name.dir和dfs.datanode.data.dir的value填写对应前面创建的目录
修改vim mapred-site.xml
 <?xml version="1.0"?>
  <!--
    Licensed under the Apache License, Version 2.0 (the "License");
    you may not use this file except in compliance with the License.
    You may obtain a copy of the License at

      http://www.apache.org/licenses/LICENSE-2.0

    Unless required by applicable law or agreed to in writing, software
    distributed under the License is distributed on an "AS IS" BASIS,
    WITHOUT WARRANTIES OR CONDITIONS OF ANY KIND, either express or implied.
    See the License for the specific language governing permissions and
    limitations under the License. See accompanying LICENSE file.
  -->
 <configuration>

 <!-- Site specific YARN configuration properties -->
  <property>
    <name>yarn.resourcemanager.address</name>
    <value>bigdata111:18040</value>
  </property>
  <property>
    <name>yarn.resourcemanager.scheduler.address</name>
    <value>bigdata111:18030</value>
  </property>
  <property>
    <name>yarn.resourcemanager.webapp.address</name>
    <value>bigdata111:18088</value>
  </property>
  <property>
    <name>yarn.resourcemanager.resource-tracker.address</name>
    <value>bigdata111:18025</value>
  </property>
  <property>
    <name>yarn.resourcemanager.admin.address</name>
    <value>bigdata111:18141</value>
  </property>
  <property>
    <name>yarn.nodemanager.aux-services</name>
    <value>mapreduce.shuffle</value>
  </property>
  <property>
    <name>yarn.nodemanager.aux-services.mapreduce.shuffle.class</name>
    <value>org.apache.hadoop.mapred.ShuffleHandler</value>
  </property>
 </configuration>
运行hadoop
首先要格式化:
hadoop namenode -format
sh ./start-all.sh
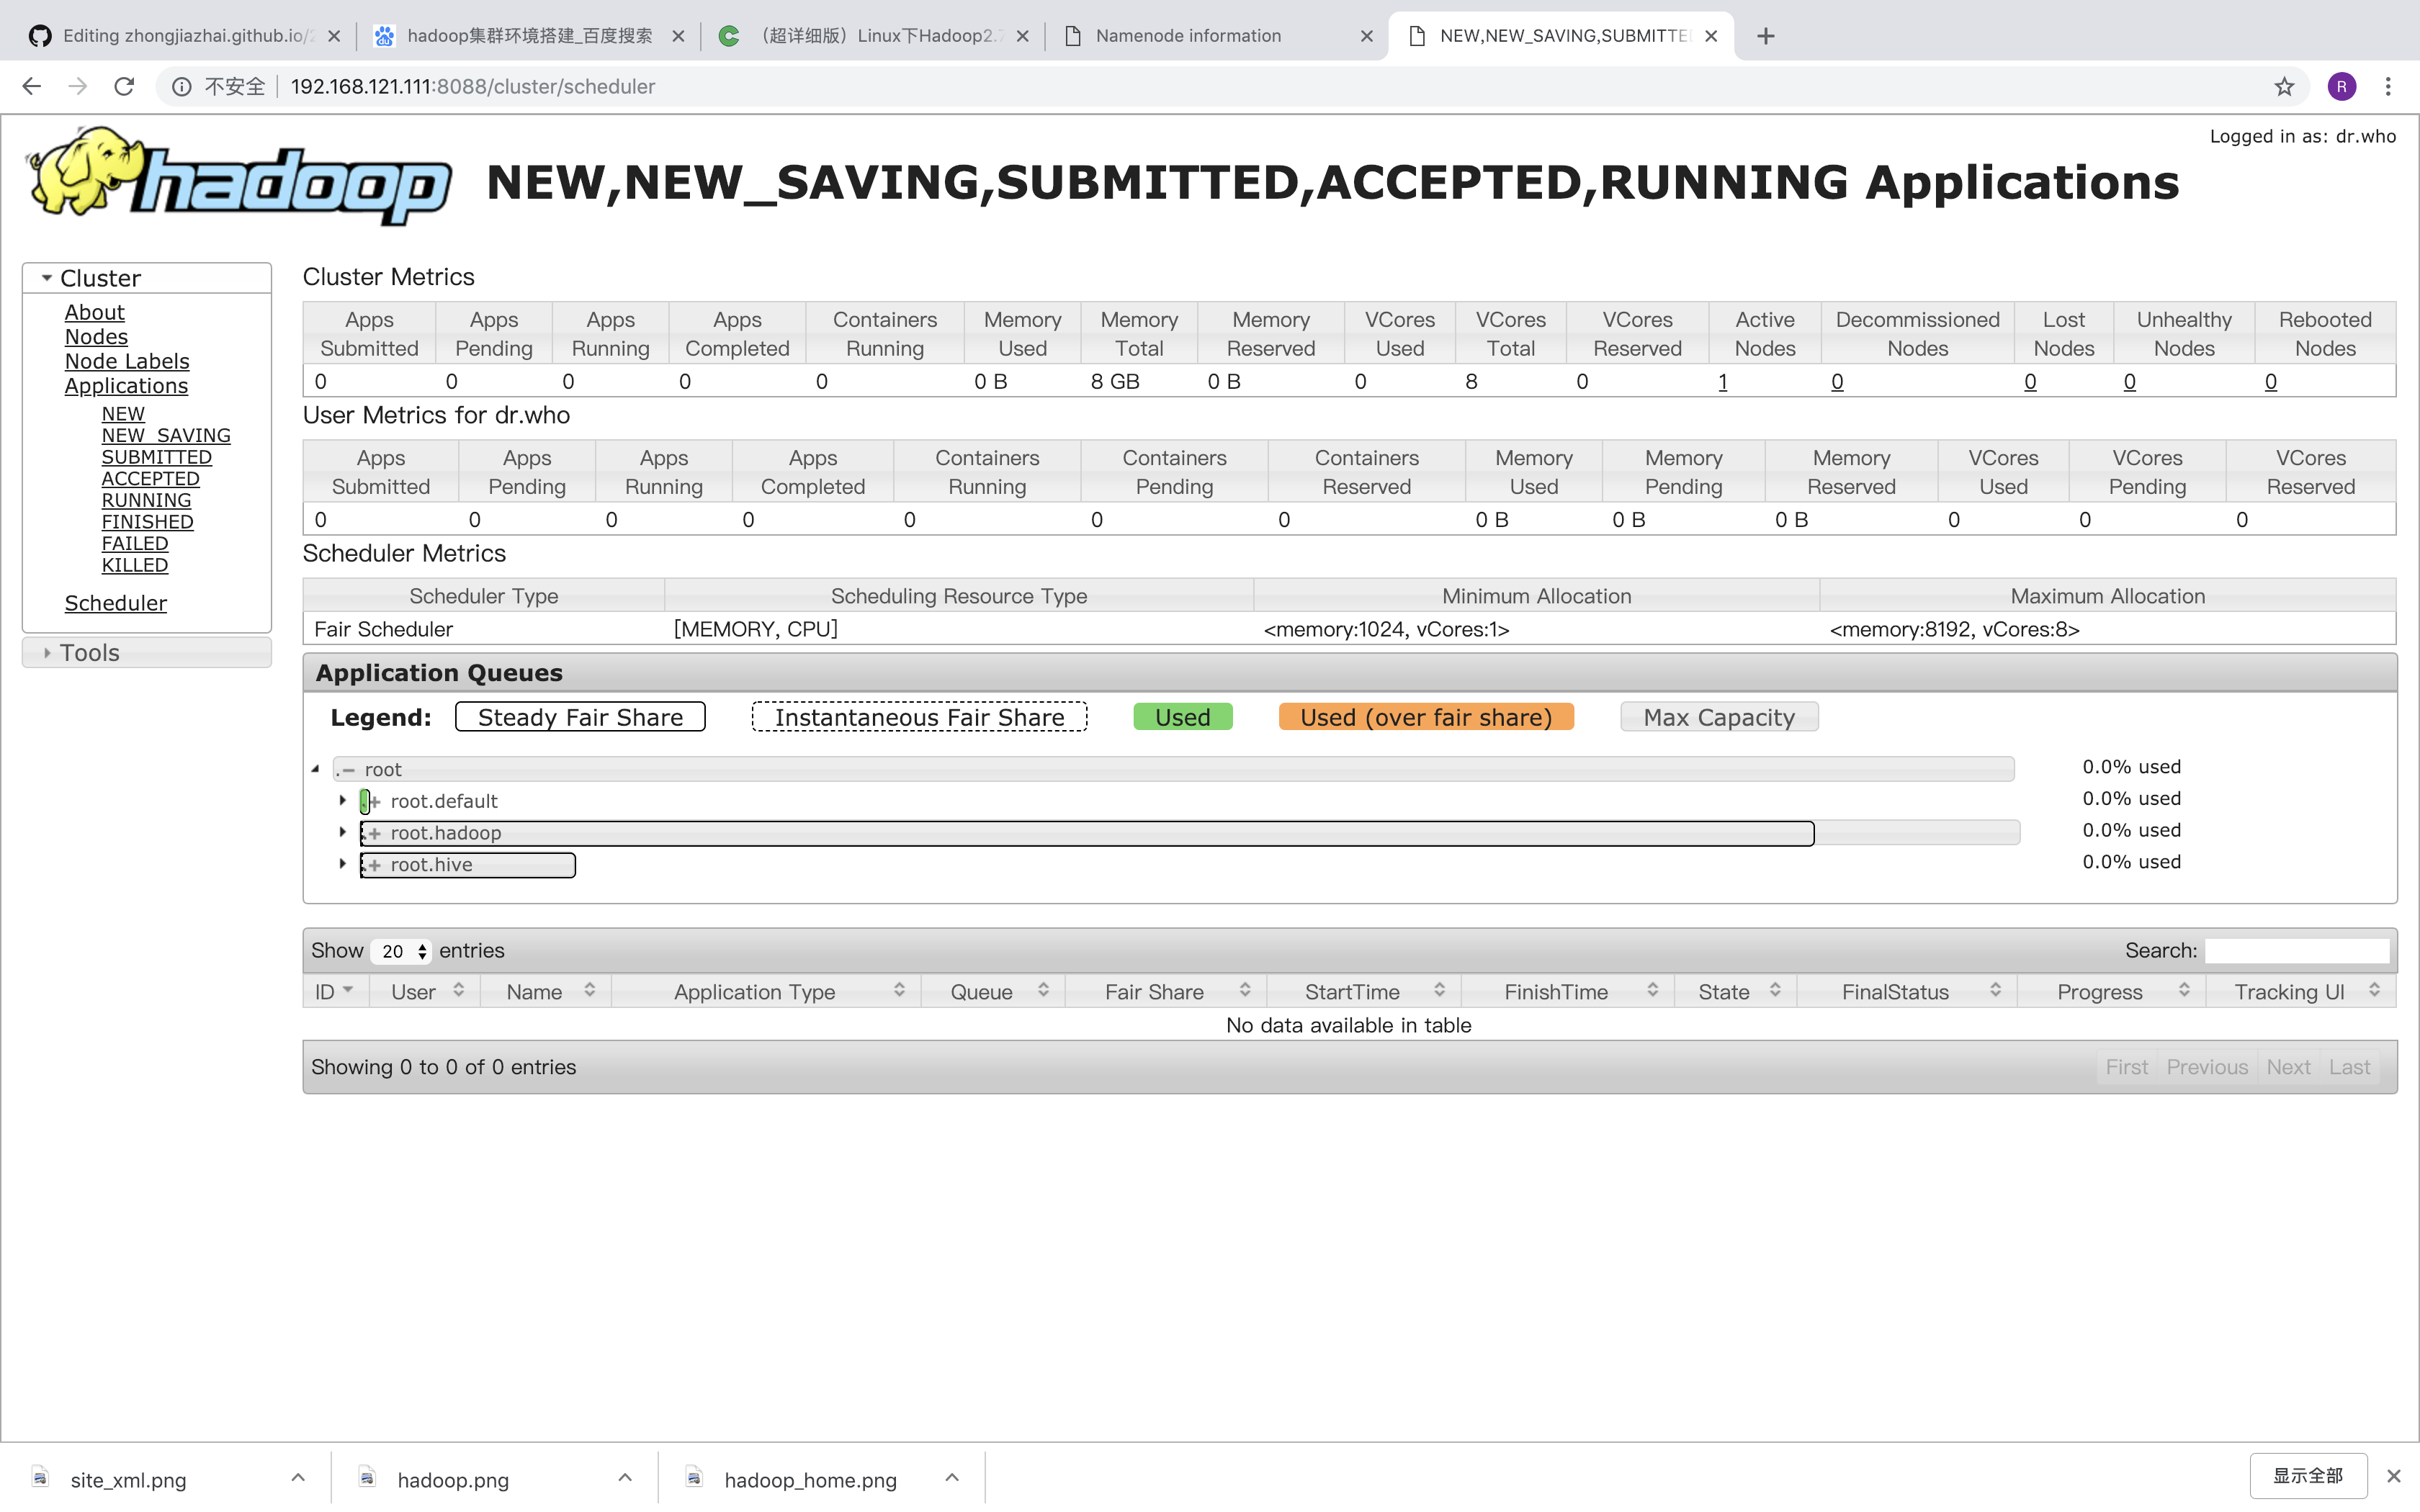
查看集群状态:
http://192.168.121.111:8088/cluster/scheduler
测试yarn
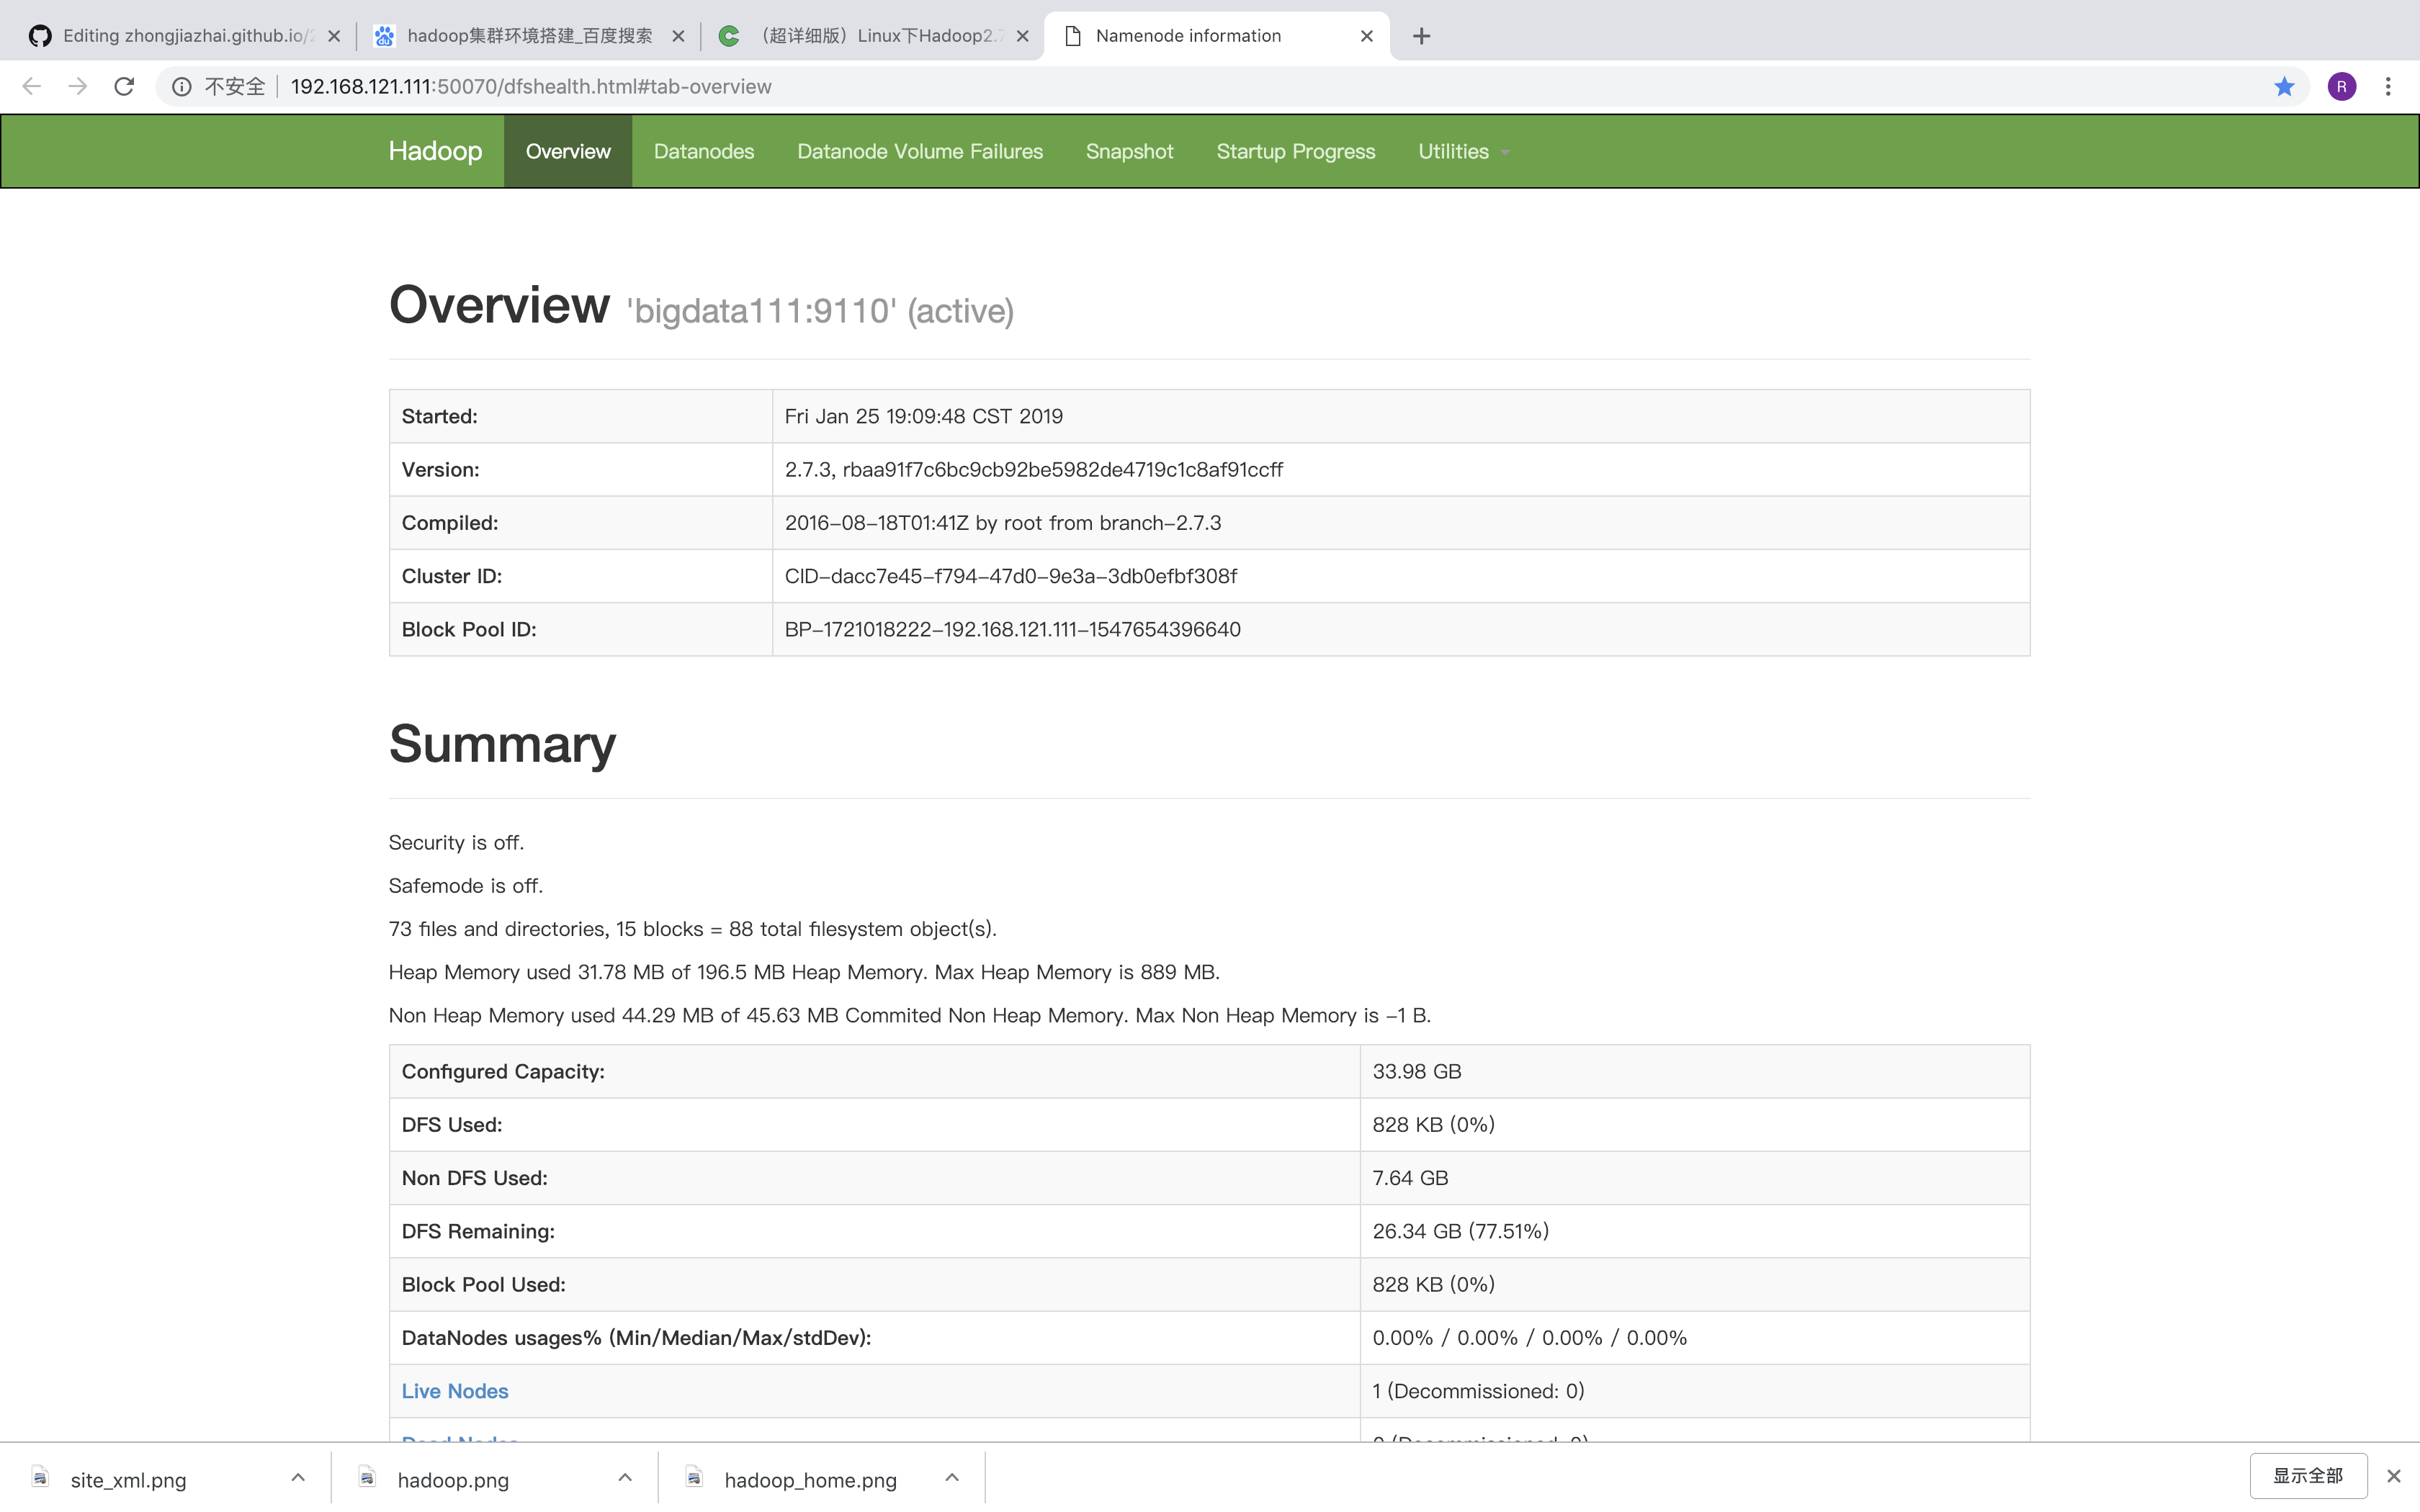
测试hdfs
http://192.168.121.111:50070/dfshealth.html#tab-overview
/data/hadoop-2.7.1/bin/hdfs dfsadmin -report
配置运行Hadoop中遇见的问题
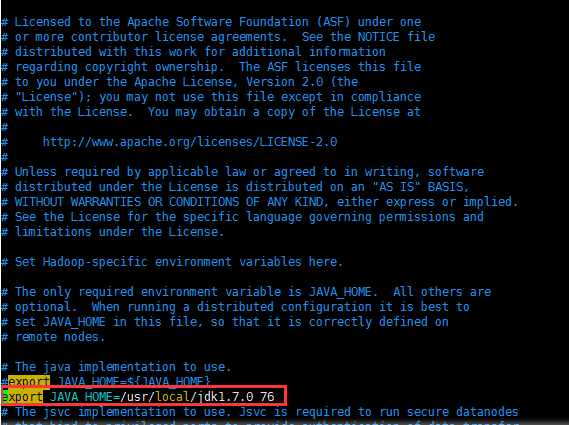
- JAVA_HOME未设置?
启动的时候报:

则需要/data/hadoop-2.7.1/etc/hadoop/hadoop-env.sh,添加JAVA_HOME路径
- FATAL org.apache.hadoop.hdfs.server.datanode.DataNode: Initialization failed for block pool Block pool BP-336454126-127.0.0.1-1419216478581 (storage id DS-445205871-127.0.0.1-50010-1419216613930) service to /192.168.149.128:9000 org.apache.hadoop.ipc.RemoteException(org.apache.hadoop.hdfs.server.protocol.DisallowedDatanodeException): Datanode denied communication with namenode: DatanodeRegistration(0.0.0.0, storageID=DS-445205871-127.0.0.1-50010-1419216613930, infoPort=50075, ipcPort=50020, storageInfo=lv=-47;cid=CID-41993190-ade1-486c-8fe1-395c1d6f5739;nsid=1679060915;c=0)
原因: 由于本地dfs.data.dir目录下的数据文件和namenode已知的不一致,导致datanode节点不被namenode接受。
解决:
1,删除dfs.namenode.name.dir和dfs.datanode.data.dir 目录下的所有文件
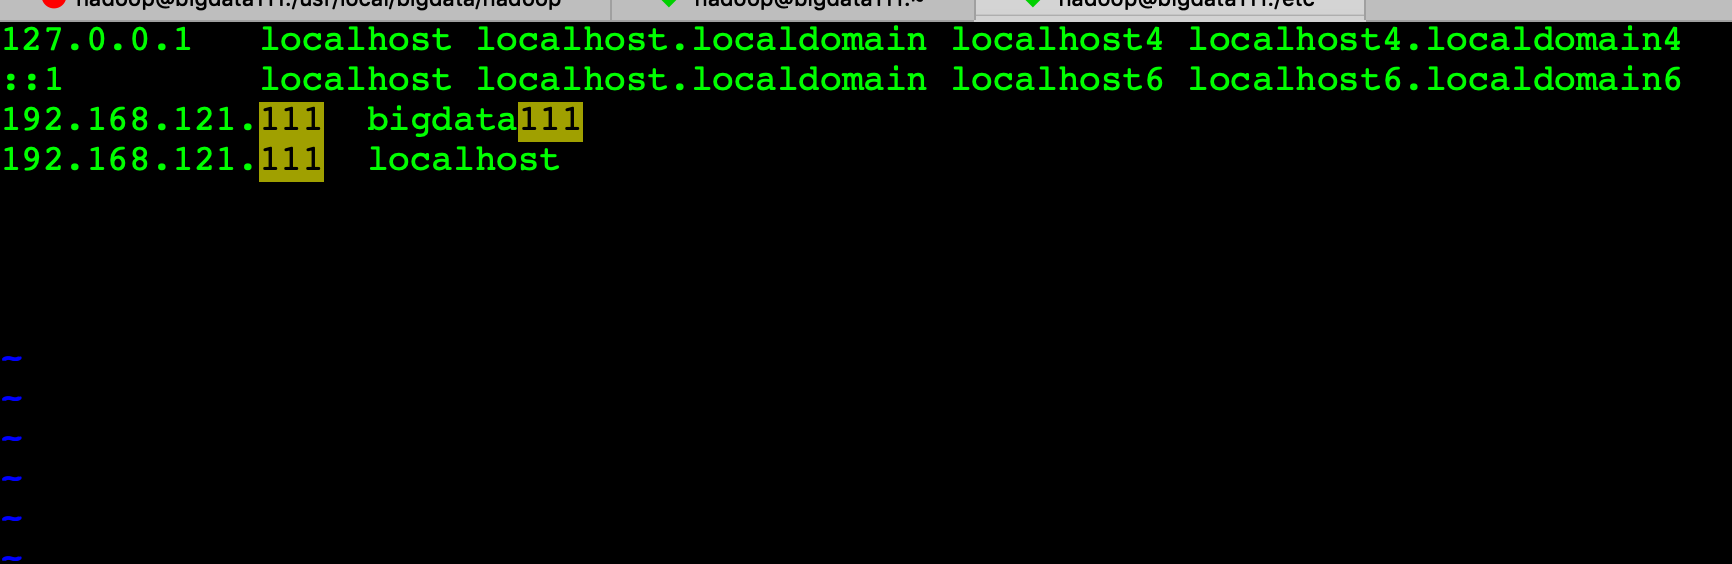
2,修改hosts
   cat /etc/hosts
  127.0.0.1   localhost localhost.localdomain localhost4 localhost4.localdomain4
  ::1         localhost localhost.localdomain localhost6 localhost6.localdomain6
 192.168.121.111 bigdata111
  192.168.121.111 localhost
3,重新格式化:bin/hadoop namenode -format
4,启动
重新启动
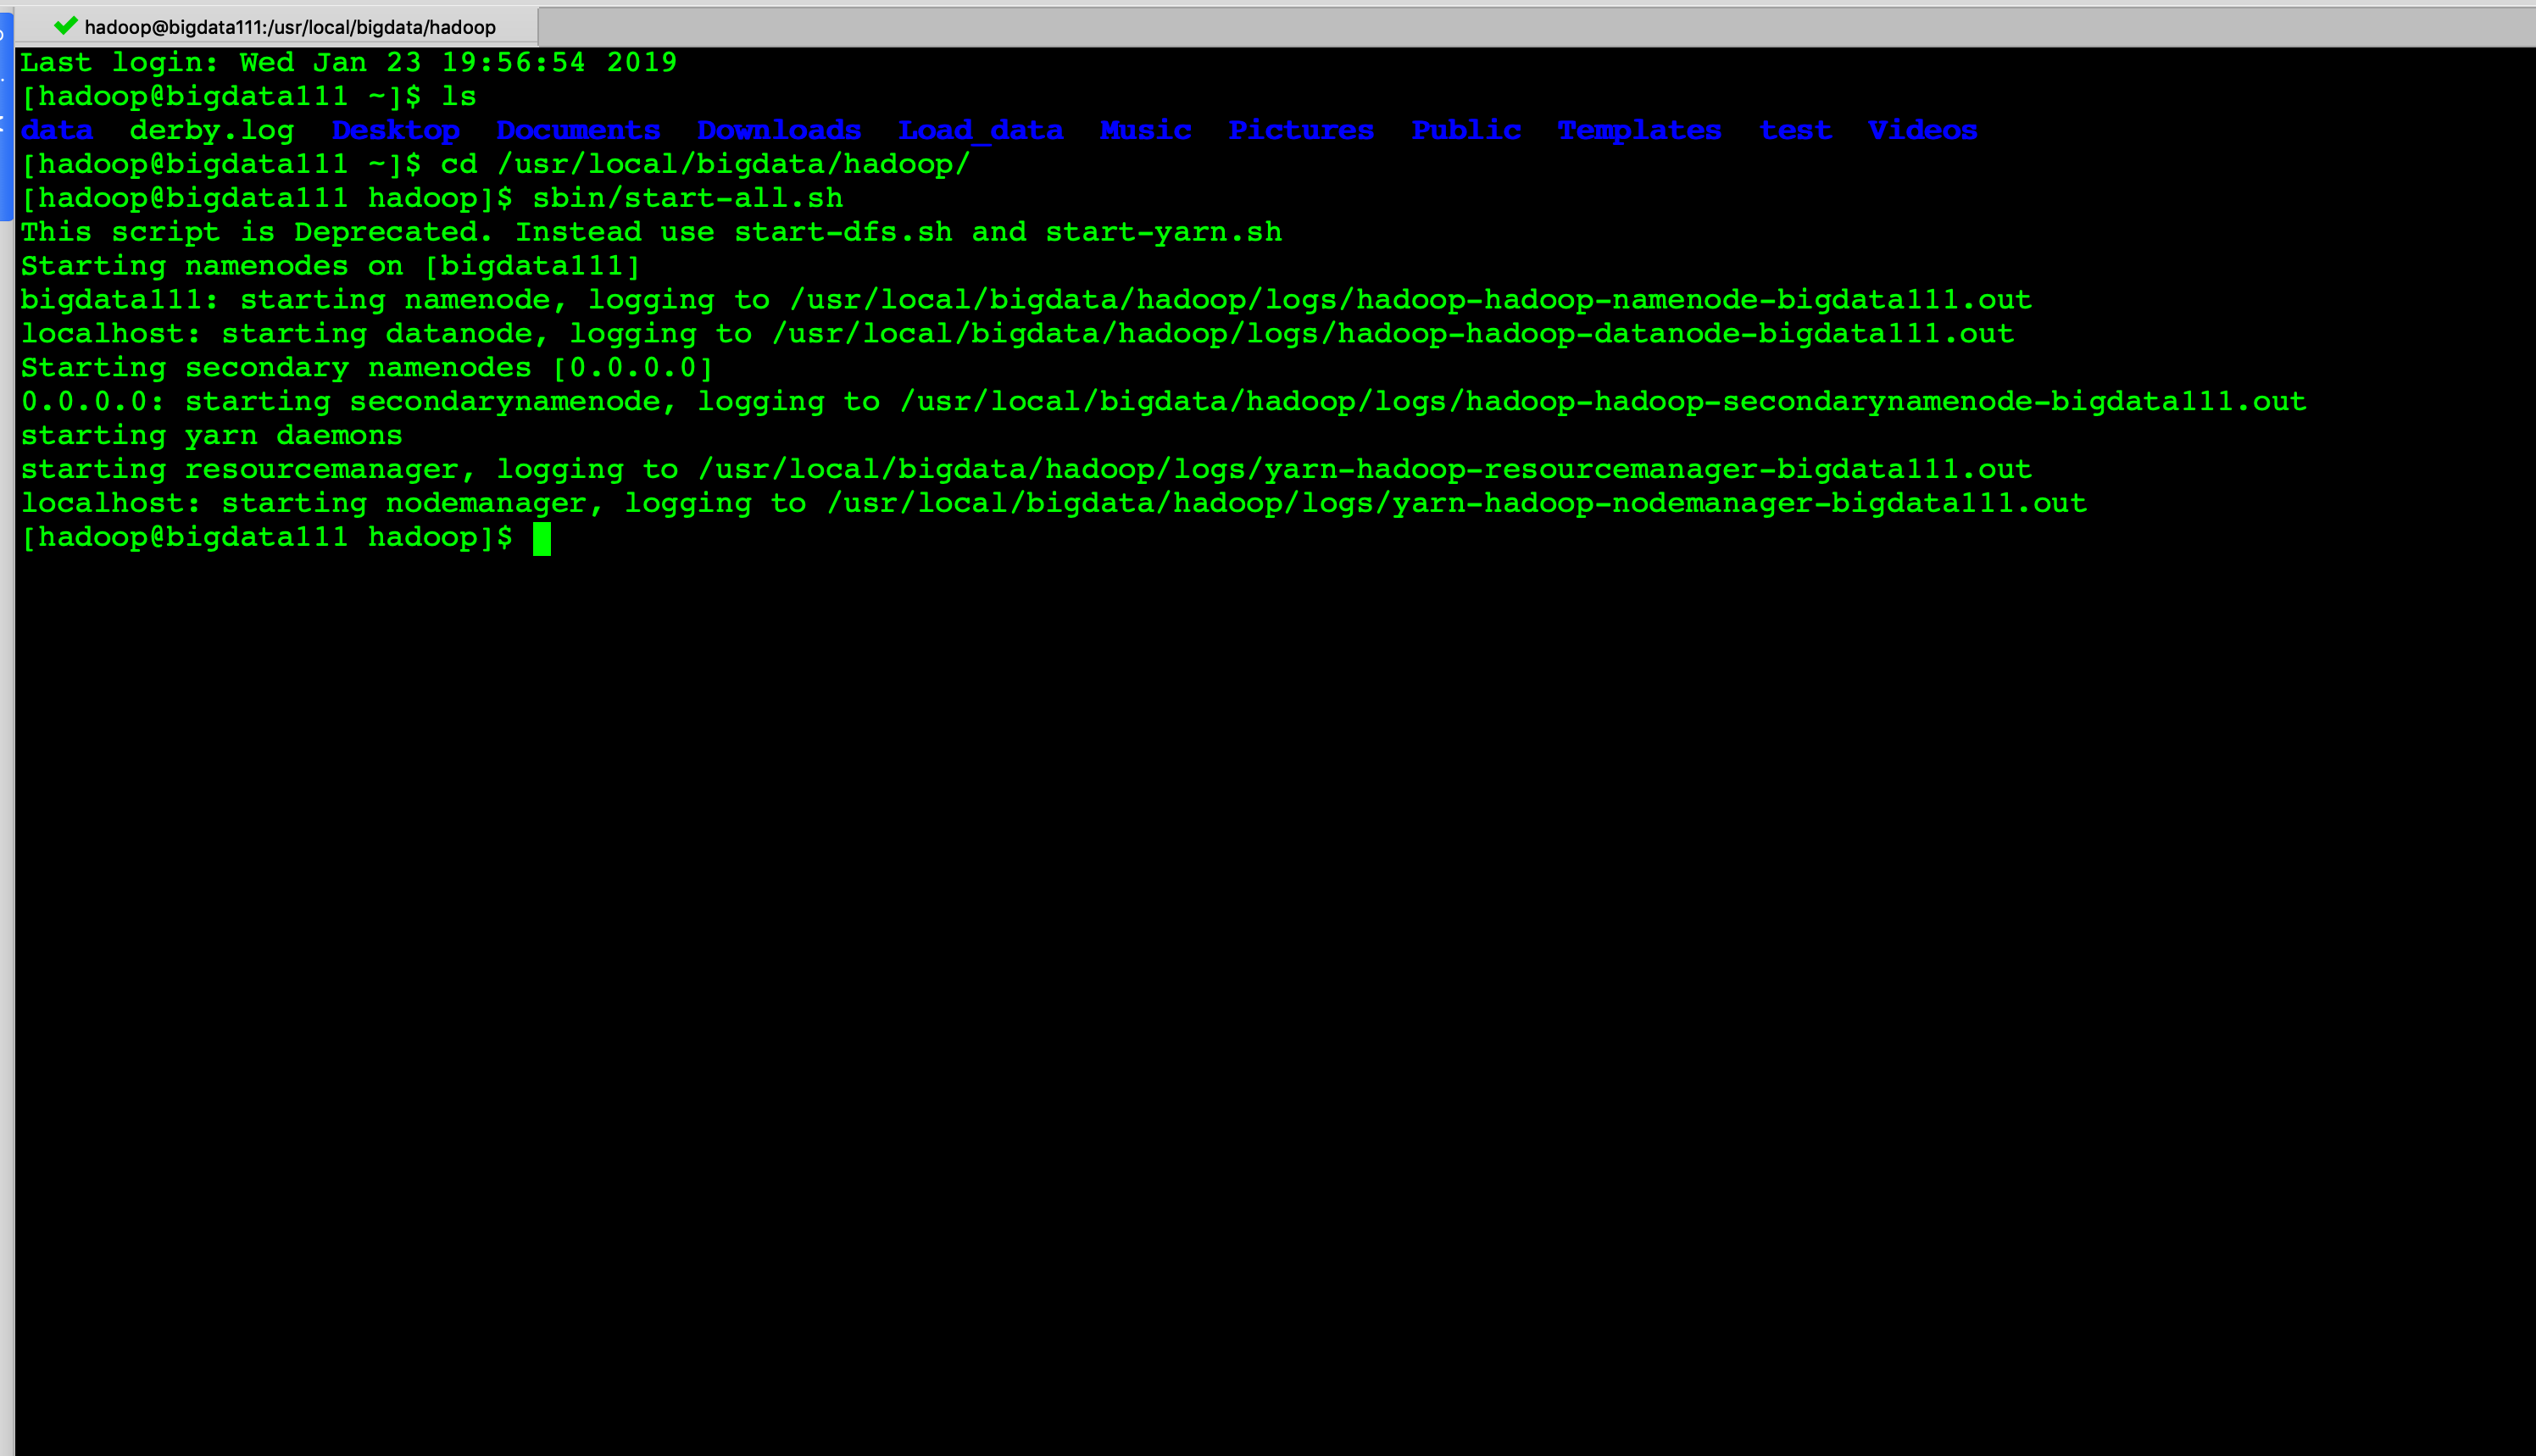
集群启动
sbin/start-all.sh
历史执行查询服务启动
sbin/mr-jobhistory-daemon.sh start historyserver
启动 hive2 服务
nohup hive –service metastore >/dev/null 2>&1 & ## 必须先启动hive元数据存储服务
then 之后启动hive2 的服务:
nohup hive –service hiveserver2 >/dev/null 2>&1 & ## 再启动后面的hive2服务
启动 spark 集群
${SPARK_HOME}/sbin/start-all.sh ${SPARK_HOME}/sbin/start-thriftserver.sh –master yarn ## 使用spark 用户启动。即被指定 spark队列中。
停止
${SPARK_HOME}/sbin/stop-thriftserver.sh ${SPARK_HOME}/sbin/stop-all.sh ${HADOOP_HOME}/sbin/mr-jobhistory-daemon.sh stop historyserver ${HADOOP_HOME}/sbin/stop-all.sh
linux用户名 hadoop/hadoop root/password
hive/beeline
例子: beeline !connect jdbc:hive2://bigdata111:10000 hadoop/hadoop
mysql
数据库名 root/root1234 hive/hive1234 登陆格式: mysql -uroot -proot1234
下面说一下集群启动中遇到的问题:
-
在启动hadoop过程中,jps 发现namenode 没有启动,通过日志查看 tail -f hadoop-hadoop-namenode-bigdata111.log,发现是in_use.lock文件权限问题? 做了如下的操作:
-
修改日志文件权限:chown -R hadoop:hadoop /usr/local/bigdata/hadoop/logs
-
修改文件所在文件夹权限 chown -R hadoop:hadoop/usr/local/bigdata/hadoop/data/dfs/name
- 重新启动,问题解决了。
-
Linux 常用命令查看文件路径
hdfs dfs -ls /
rm -rf* 删除当前文件夹下所有内容
rm -rf current/ current 文件夹下所有内容
hdfs namenode -format namenode 节点格式化
ls -ltr
mv 旧的文件名 新的文件名
hive 表中加载数据
load data [local] inpath ‘filepath’ [overwrite] into table tablename[partition(partcol1=val1,partcol2=val2)] 在load 表的过程中,表的stored 格式必须是textfile,否则出现错误;